Eureka Server 구현
ext {
   set('springCloudVersion', "2021.0.7")
}

dependencies {
   implementation 'org.springframework.cloud:spring-cloud-starter-netflix-eureka-server'
   testImplementation 'org.springframework.boot:spring-boot-starter-test'
}

dependencyManagement {
   imports {
      mavenBom "org.springframework.cloud:spring-cloud-dependencies:${springCloudVersion}"
   }
}
yml 파일
server:
  port: 8761

spring:
  application:
    name: discoveryservice

# 기본값은 true 이기 때문에 eureka server는 서버 역할만 하고 스스로를 등록하지 않도록 false 설정
eureka:
  client:
    register-with-eureka: false
    fetch-registry: false
@SpringBootApplication
@EnableEurekaServer
public class DiscoveryserviceApplication {

   public static void main(String[] args) {
      SpringApplication.run(DiscoveryserviceApplication.class, args);
   }

}
User Service 구현
plugins {
    id 'java'
    id 'org.springframework.boot' version '2.7.12'
    id 'io.spring.dependency-management' version '1.0.15.RELEASE'
}

group = 'com.example'
version = '0.0.1-SNAPSHOT'
sourceCompatibility = '17'

configurations {
    compileOnly {
        extendsFrom annotationProcessor
    }
}

repositories {
    mavenCentral()
}

ext {
    set('springCloudVersion', "2021.0.7")
}

dependencies {
    implementation 'org.springframework.boot:spring-boot-starter-web'
    implementation 'org.springframework.cloud:spring-cloud-starter-netflix-eureka-client'
    compileOnly 'org.projectlombok:lombok'
    developmentOnly 'org.springframework.boot:spring-boot-devtools'
    annotationProcessor 'org.projectlombok:lombok'
    testImplementation 'org.springframework.boot:spring-boot-starter-test'
}

dependencyManagement {
    imports {
        mavenBom "org.springframework.cloud:spring-cloud-dependencies:${springCloudVersion}"
    }
}

tasks.named('test') {
    useJUnitPlatform()
}
yml 파일
server:
  port: 9001

spring:
  application:
    name: user-service

eureka:
  client:
    # fetch-registry => eureka 서버로부터 인스턴스들의 정보를 주기적으로 가져올 것인지를 설정 => true: 갱신된 정보를 받겠다는 설정
    fetch-registry: true
    register-with-eureka: true
    service-url:
      defaultZone: http://127.0.0.1:8761/eureka
서버 실행시 eureka ui에서 다음과 같은 확인이 가능하다.


User Service를 edit configuration에서 복사해보자.

같은 port를 사용하기 때문에 포트를 변경해준다.
이때 yml 파일을 변경하는 것이 아니라 vm 옵션으로 설정

두 가지 서버를 동시에 작동할 수 있게 되었다.
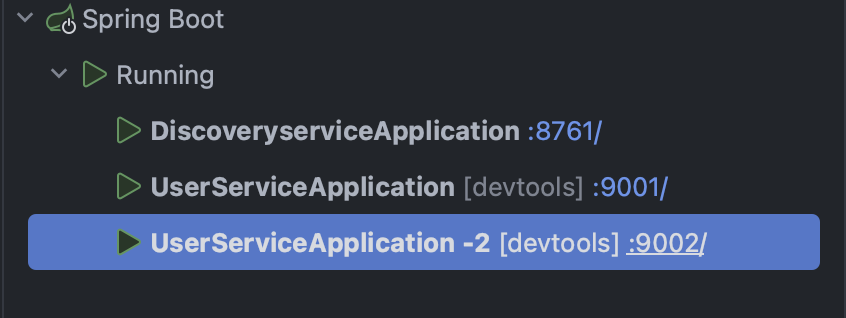
유레카 화면을 새로고침 하면 두 개 서버가 뜬 것을 볼 수 있다.

라우팅에 의해서 두가지 서비스 중 하나를 선택하여 처리 -> 분산 접근이 가능하게 되었다.
터미널을 통해서도 app을 실행시킬 수 있다.
mvn
mvn spring-boot: run -Dspring-boot.run.jvmArguments='-Dserver.port=9003'
gradle
./gradlew bootRun --args='--server.port=9003'

Jar 파일을 통해서도 실행시키는 방법
java -jar -Dserver.port=9004 ./build/libs/user-service-v.0.0.1.jar
이렇게 하여 4개의 인스턴스를 띄울 수 있다.
그런데 이렇게 매번 port를 개발자가 직접 할당해주는 것은 좋지 않다.
yml 파일에서 server.port에서 0 값을 설정하면 랜덤으로 설정된다.


그런데 문제는 이러한 방식으로 서버를 여러개 띄우면 유레카에서는 포트 번호를 0으로 표시하기 때문에
하나의 인스턴스만 보이게 된다.

이를 해결하기 위해 eureka.instance.instance-id 값을 설정한다.
eureka:
  instance:
    instance-id: ${spring.cloud.client.hostname}:${spring.application.instance_id:${random.value}}


정상적으로 등록되는 것을 확인할 수 있다.
반응형
'Programming > Java, Spring' 카테고리의 다른 글
| [Spring Cloud] Users MicroService를 Api Gateway에 등록하기 (0) | 2023.05.31 |
|---|---|
| [Spring Cloud] API Gateway Service / routing, filter (0) | 2023.05.31 |
| 마이크로서비스(MSA)와 스프링 클라우드 (Spring Cloud) (0) | 2023.05.31 |
| SpringBoot에서 profile 환경 설정 구성하기 (복수 profile 지정하는법) (0) | 2023.05.22 |
| gradle 빌드 오류 날 때 클린 해주기 : org.springframework.beans.factory.BeanDefinitionStoreException (0) | 2023.03.09 |


